Set up Android Studio with ViroReact
Android Emulator NOT supported
ViroReact doesn't currently support the Android Emulator
Prerequisites
Have you run through the Prerequisites guide?
Run through steps on the Prerequisites guide before beginning this guide.
1. Project Structure
If you've completed the Quick Start guide, you should be set up and the HelloWorld project works on the Viro Media App. Your workspace should look similar to the following:
ViroSample/├── App.js├── android├── app.json├── bin├── index.android.js├── index.ios.js├── index.js├── ios├── js├── node_modules├── package.json├── metro.config.js├── rn-cli.config.js├── setup-ide.sh
What each file/directory is for
- App.js - the main Javascript file containing the logic for the application android - the directory containing the Android source app.json - miscellaneous React Native property file bin - contains various scripts index.android.js - legacy file that points to App.js to launch your application for Android index.ios.js - legacy file that points to App.js to launch your application for iOS index.js - entry file that points to the main application in App.js ios - directory containing the iOS source js - directory containing the Javascript source node_modules - directory containing all the node modules as specified by the package.json file package.json - file that tells node what modules are required metro.config.js - file that configures the React Native CLI / React Native's metro bundler (we use it to whitelist new file extension for the packager server) rn-cli.config.js - (LEGACY; used by older React Native bundler. This older config file would be removed in a subsequent version of react-viro) file that configures the React Native CLI (we use it to whitelist new file extensions for the packager server). * setup-ide.sh - script used to automatically set up Xcode and Android Studio from scratch.
2a. [OSX/Linux ONLY] Run setup-ide.sh Script
setup-ide.sh ScriptIn a terminal window, navigate to your Viro project root (not Android project root) and run the following:
./setup-ide.sh android
This will set up the Android project to work with Viro.
2b.[Windows ONLY]
For Windows use our Windows Setup Diff file to modify your Android gradle and manifest files.
3. Android Studio
Android Studio is the IDE (Integrated Developer Environment) used for Android development and we will need it to run and test your Viro React application.
Install a recent version of the JDK
Android Studio requires a recent version of the JDK. If you don't have one installed, install one from here
Install Android Studio
Download and install Android Studio from here.
Configuring Android Studio
Ensure that Android Studio is configured with at least the following:
- Google APIs
- Android SDK Platform 28
- Sources for Android 28
by selecting Custom installation while installing Android Studio or by installing them from the SDK Manager under Preferences -> Appearance & Behavior -> System Settings -> Android SDK
Building AR/ARCore With Android Studio
Because of existing issues with AR Core, please ensure that you have disabled instant run in Android Studio before building your application!
4. Open your project in Android Studio
Open Android Studio, if you see a welcome screen, select Open an existing Android Studio project, otherwise open the project with File -> Open.
When the file explorer menu appears navigate to your Project location and open the android/build.gradle file
Android Emulator
Viro currently does not support development with the Android Emulator. You will need to develop with your device to use the Viro platform, at this time.
5. Enable Developer Mode on Android Device
- Enable Developer Mode on your Android device
- Enable USB Debugging within the Developer Menu
6. Run the Application
- Connect your device to your computer via USB. When a pop-up appears asking to "Allow USB Debugging?", select "OK".
- In your terminal, run this command
adb reverse tcp:8081 tcp:8081which will reverse tether your device to your development machine. (Note: theadbcommand can be found underplatform-toolswherever your sdk is installed, it's recommended that you add this to your environment's $PATH variable.). - Run 'npm start' from the project root directory to start the package server
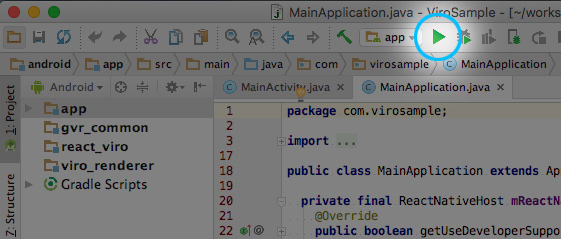
- Ensure the target to the left of the green run button is set to "app" and tap on the green run button (see image below).

Run the application and you should see the Hello World scene.
Congratulations, you now have Viro set up and running!

Additional Platforms
On Android, we support 3 VR Platforms: Google Daydream, Samsung/Oculus GearVR and Google Cardboard. For the Viro Platform however, we only have 2 build flavors:
- GVR - for Google Daydream and Cardboard
- OVR_MOBILE - for Samsung/Oculus GearVR.
From Android Studio
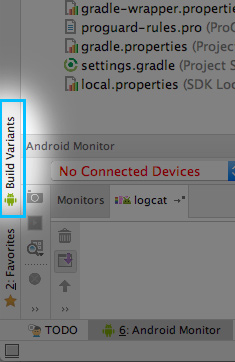
One way to toggle between the builds is to expand the Build Variants panel on the left edge of your Android Studio window and select either gvrDebug and ovrDebug.

From the command line
Another way to build your native app is from the command line. Since Viro was built with the goal of working like any other React Native package, you can take advantage of the React Native CLI to build, package and deploy your application to your device.
From the command line, you can run this command with one of the variants from your project's root directory:
react-native run-android --variant=<gvrDebug|ovrDebug>
to build your app for a selected variant.
Next Steps
Check out our Tutorial if you haven't yet gone through it!
Problems with installation? Need extra help? Post your issue here.
Updated almost 4 years ago