Tutorial AR
AR Support Devices
ARKit - iOS Device with A9 chip or higher and running iOS 11 ARCore - an ARCore supported device running Android N.
This tutorial requires the completion of the Quick Start.
This tutorial is a step by step guide for developing a simple AR app. Our goal by the end of this tutorial is to:
- Understand HelloWorldSceneAR.js
- Place a textured Box into the world
- Add a Smiley Emoji to the scene
- Select an ARPlane
- Add the emoji to the plane
- Add a shadow to the emoji
- Make the emoji draggable
- Animate the box
Understanding HelloWorldSceneAR.js
Open your test project in the Viro Media App (like you did in the Quick Start (Mac/Linux)) and select the AR option. You should see the following, "Hello World" in white overlay in your camera view:
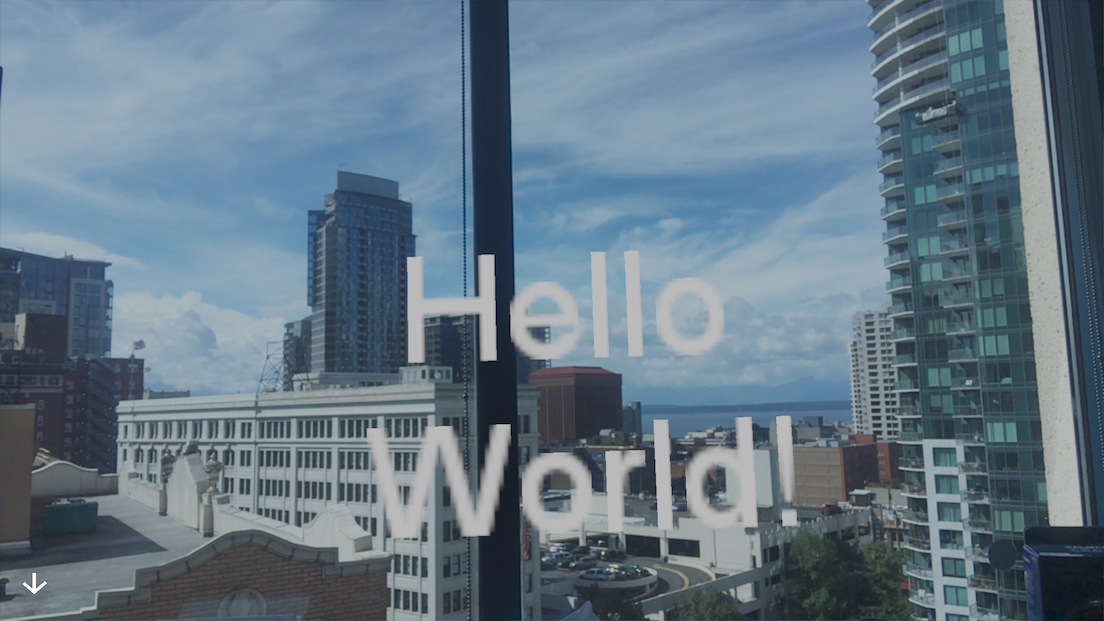
HelloWorldAR scene
The scene you are presented with is HelloWorldSceneAR.js which is set as the initialScene on the ViroARSceneNavigator component in the App.js, which serves as the entry point into your app.
ViroReact is built on top of React Native and uses React Native constructs to make it easy to create native AR applications. In addition to understanding Javascript, you will also need to understand some basic React concepts, like JSX, components, state, and props.
Below is the code for HelloWorldSceneAR:
import React, { FC } from 'react';
import { StyleSheet } from 'react-native';
import { ViroARScene, ViroTrackingStateConstants, ViroText } from '@viro-community/react-viro';

 const handleTrackingUpdated = (
  state: ViroTrackingState,
  reason: ViroTrackingReason,
) => {
  if (state === ViroTrackingStateConstants.TRACKING_NORMAL) {
    console.log('TRACKING_NORMAL', reason);
  } else if (state === ViroTrackingStateConstants.TRACKING_UNAVAILABLE) {
    // Handle loss of tracking
    console.log('TRACKING_UNAVAILABLE', reason);
  } else if (state === ViroTrackingStateConstants.TRACKING_LIMITED) {
    // Handle limited tracking state
    console.log('TRACKING_LIMITED', reason);
  } else {
    console.log('UNKNOWN', state, reason);
  }
};

const HelloWorldSceneAR: FC = () => {
  return (
    <ViroARScene onTrackingUpdated={handleTrackingUpdated}>
      <ViroText
        text={'Hello World!'}
        scale={[0.5, 0.5, 0.5]}
        position={[0, 0, -1]}
        style={styles.helloWorldTextStyle}
      />
    </ViroARScene>
  );
};

export default () => {
  return (
    <ViroARSceneNavigator
      autofocus={true}
      initialScene={{
        scene: HelloWorldSceneAR,
      }}
      style={styles.f1}
    />
  );
};

const styles = StyleSheet.create({
  f1: {flex: 1},
  helloWorldTextStyle: {
    fontFamily: 'Arial',
    fontSize: 30,
    color: '#ffffff',
    textAlignVertical: 'center',
    textAlign: 'center',
  },
});
Let's see what's happening in the code above...
Importing Components
The code begins by importing React, StyleSheet from React Native and react-viro components that the app will use. In this app we use ViroARScene and ViroText.
'use strict';import React, { Component } from 'react';import {StyleSheet} from 'react-native';import { ViroARScene, ViroText, ViroConstants} from 'react-viro'; ...
HelloWorldSceneAR component
Below the import code, we create a functional component HelloWorldSceneAR that extends a React Component that adheres to the react component lifecycle. Read more about ES6 classes here and here.
First we start with the constructor(). In the constructor, we call the super()/parent constructor (in Component) and we initialize the state. Below that, we "bind" this to the functions we declare in this class so that they may reference this object.
Next, we have the render() function which determines how our scene is displayed. It's defined using JSX which is syntactically similar to HTML. In the section below we go through this method in detail.
- In the return statement, we declare the top level component:
ViroARScene. Every AR scene must have aViroARSceneas its top-most element. All other components are children ofViroARScene. We use the callback prop,onTrackingUpdated, to call our_onInitialized()function below which sets the text to "Hello World!" once the tracking status isTRACKING_NORMAL.
ViroTextis declared next. It switches between "Initializing AR..." and "Hello World" depending on the state at a position of [0,0,-1] with the font, font size and color specified by thestyleproperty. In our coordinate system, the viewer faces in the negative-Z direction, so providing a Z coordinate of -1 places the object in front of the viewer.
Declaring Styles
After the render method, we declare styles that can be used in our application. Styles generally represent layout properties for components. In our app, we declare a style named helloWorldTextStyle that describes the font type, color, size and alignment for our ViroText component.
var styles = StyleSheet.create({ helloWorldTextStyle: { fontFamily: 'Arial', fontSize: 30, color: '#ffffff', textAlignVertical: 'center', textAlign: 'center', },});module.exports = HelloWorldSceneAR;
Now that we described how our scene works, let's see how we can expand upon it.
Downloading Assets
The first thing we need to do is to download assets that we'll be using for the tutorial, follow the steps below:
- Download the bundle of assets
- Unzip the file and replace the
resfolder at<path_to>/ViroSample/js/.
Adding Components to a Scene
Let's take our current HelloWorld scene and add a 3D Box above the "Hello World" text. We can do this by using the ViroBox component. To add a box to our scene we do the following:
First we import ViroBox and ViroMaterials from react-viro so our import statements now look like:
import { ... ViroBox, ViroMaterials,} from 'react-viro';
Next we need to add the box to our scene. The ViroBox API Reference lets us know what properties we can set to customize our box.
Copy the following code and add it below the ViroText component:
<ViroBox position={[0, -.5, -1]} scale={[.3, .3, .1]} materials={["grid"]} />
Customizing the ViroBox
In the above code, we set the position of the ViroBox to [0, -.5, -1] so that it sets beneath the "Hello World" text.
We then scale the ViroBox by [.3, .3, .1] to make it smaller as its default width, height, and length is 1 (meters).
The materials property allows you to set a pre-defined material (see ViroMaterials) as a texture on the box itself. In this example, we set a material named grid on the ViroBox which we will define/create in the next step.
Defining a Material
Before we can use a material like the aforementioned grid, we need to define it. Since we have already import ViroMaterials, we can simply add the following code beneath the styles declaration.
ViroMaterials.createMaterials({ grid: { diffuseTexture: require('res/grid_bg.html'), },});
As you can see, we defined a grid material containing diffuseTexture which points to the file grid_bg.jpg in the res directory.
Two things to note here:
- The
require()function is a special function provided in React that converts a filepath into a value that the platform can use to fetch the resource. - The argument to
require()is a filepath and is relative to the location of the file (in this case both theres/directory and theHelloWorldSceneAR.jsare in the sameViroSample/js/directory.
Not finding
grid_bg.jpg?Make sure you followed the instructions under Downloading Assets to download and copy the assets we'll be using in this tutorial.
Your HelloWorldSceneAR.js should look similar to the following:
'use strict';import React, { Component } from 'react';import {StyleSheet} from 'react-native';import { ViroARScene, ViroText, ViroConstants, ViroBox, ViroMaterials,} from 'react-viro';export default class HelloWorldSceneAR extends Component { constructor() { super(); // Set initial state here this.state = { text : "Initializing AR..." }; // bind 'this' to functions this._onInitialized = this._onInitialized.bind(this); } render() { return ( <ViroARScene onTrackingUpdated={this._onInitialized} > <ViroText text={this.state.text} scale={[.5, .5, .5]} position={[0, 0, -1]} style={styles.helloWorldTextStyle} /> <ViroBox position={[0, -.5, -1]} scale={[.3, .3, .1]} materials={["grid"]} /> </ViroARScene> ); } _onInitialized(state, reason) { if (state == ViroConstants.TRACKING_NORMAL) { this.setState({ text : "Hello World!" }); } else if (state == ViroConstants.TRACKING_NONE) { // Handle loss of tracking } }}var styles = StyleSheet.create({ helloWorldTextStyle: { fontFamily: 'Arial', fontSize: 30, color: '#ffffff', textAlignVertical: 'center', textAlign: 'center', },});ViroMaterials.createMaterials({ grid: { diffuseTexture: require('res/grid_bg.html'), },});module.exports = HelloWorldSceneAR;
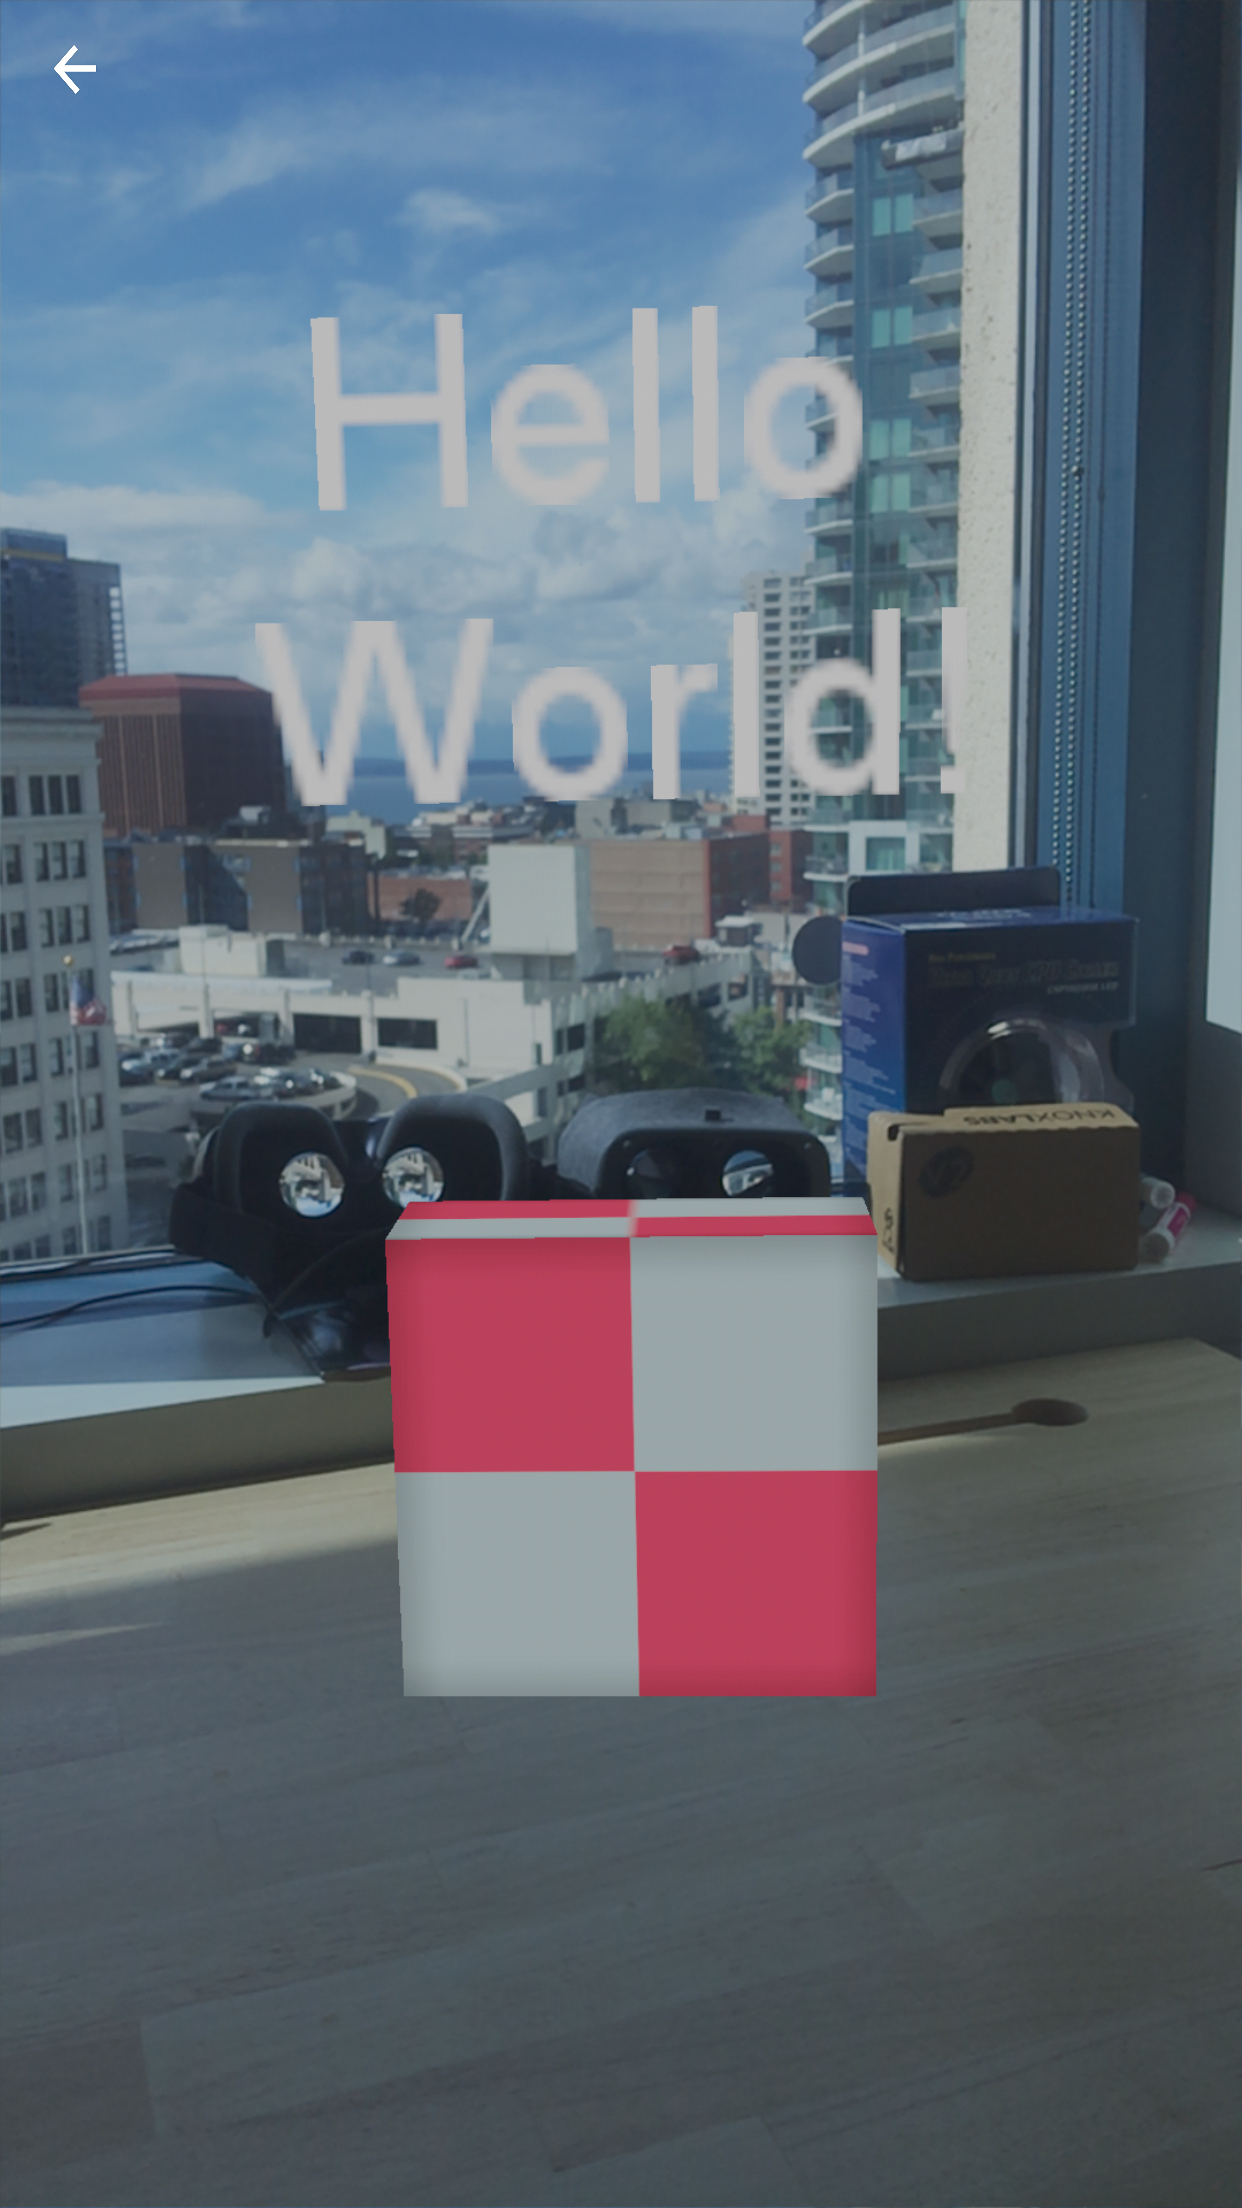
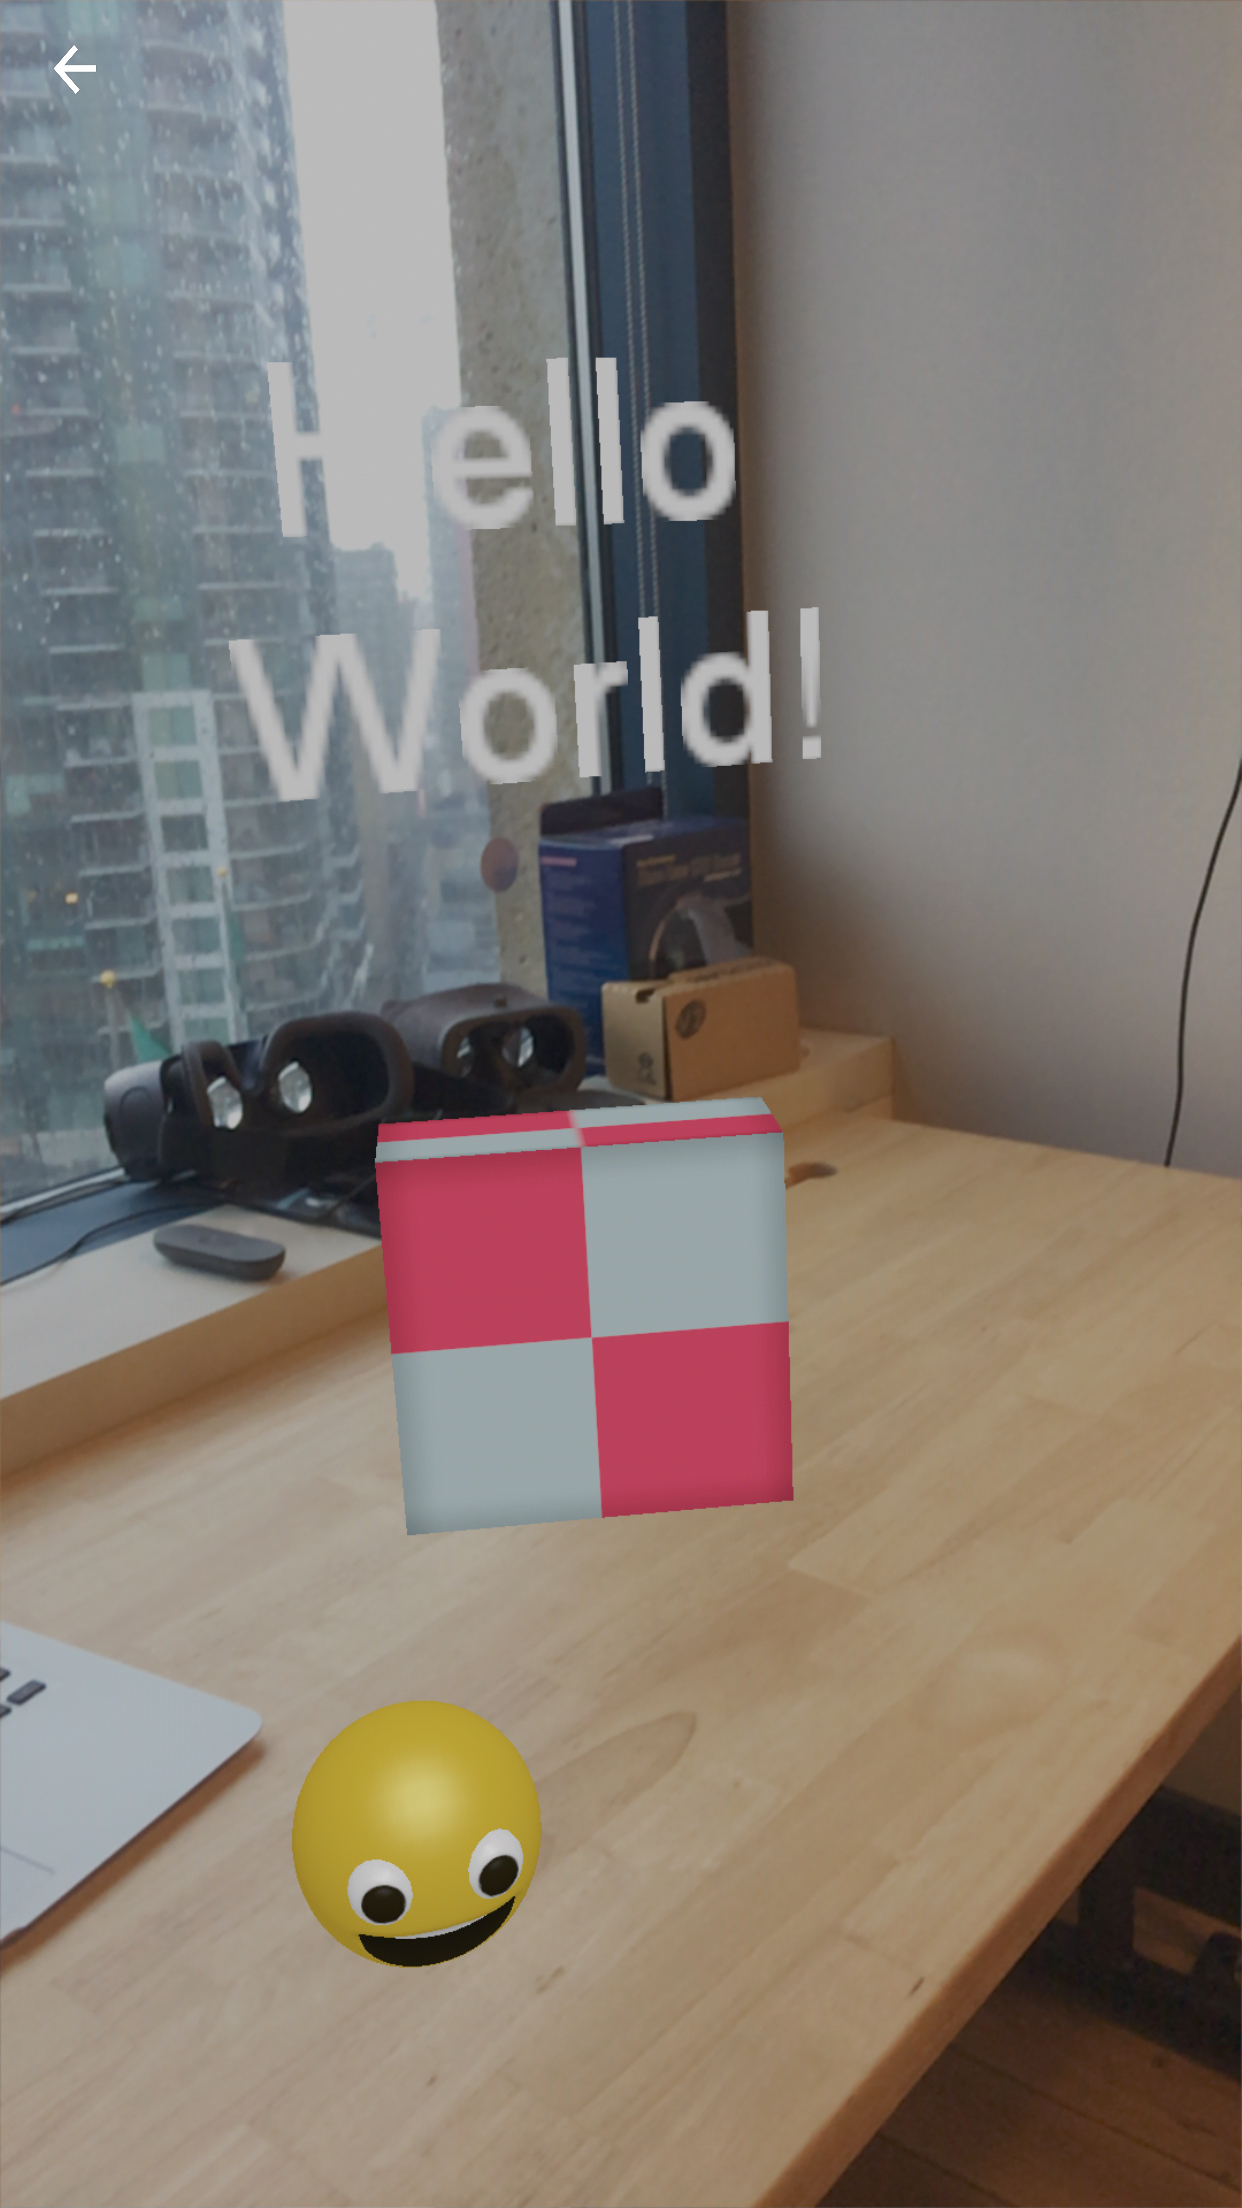
Save your HelloWorldSceneAR.js file and reload the app. You should now see a pink and grey cube under the Hello World text
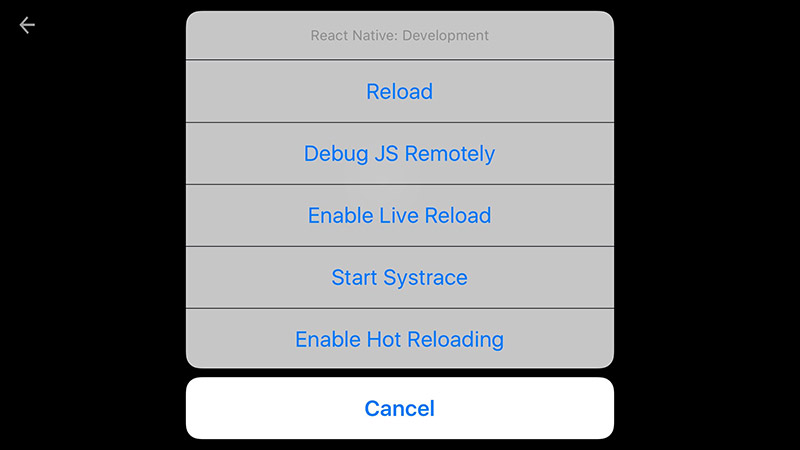
To reload your file, simply shake your device and a debug menu will appear, as shown below. Tap on "Reload" and a screen to choose AR or VR will appear. Tap on AR and your changes will appear.
Adding a 3D Object to the scene
Now let's add a 3D Object to the scene. There should be a folder in your res folder called "emoji_smile". We will be using these files to add a 3D emoji to the scene.
Add new components
We first need to import the components we'll be using: Viro3DObject, ViroAmbientLight and ViroSpotLight.
import { ... Viro3DObject, ViroAmbientLight, ViroSpotLight,} from 'react-viro';
Next we need to add the Viro3DObject and lights to our scene. Copy the code below and paste it below the ViroBox component within the ViroARScene.
<ViroAmbientLight color={"#aaaaaa"} /> <ViroSpotLight innerAngle={5} outerAngle={90} direction={[0,-1,-.2]} position={[0, 3, 1]} color="#ffffff" castsShadow={true} /> <Viro3DObject source={require('./res/emoji_smile/emoji_smile.vrx')} resources={[require('res/emoji_smile/emoji_smile_diffuse.html'), require('res/emoji_smile/emoji_smile_normal.html'), require('res/emoji_smile/emoji_smile_specular.html')]} position={[-.5, .5, -1]} scale={[.2, .2, .2]} type="VRX" />
Save your file and reload the Testbed app. You should see the scene below. Move around if you are unable to see all the components at first as they might be to your left.
Using ViroARPlane
In an AR app, the device's camera is used to present a live, onscreen view of the physical world. Three-dimensional virtual objects are superimposed over this view, creating the illusion that they actually exist.
One method for placing objects in the real world is by using the ViroARPlane or ViroARPlaneSelector component. When the AR system detects a plane, ViroReact attempts to attach it to any declared ViroARPlane components and continually keeps the virtual plane anchored to the detected real-world plane. On the other hand, the ViroARPlaneSelector component enables developers to allow their users to select the plane that they want the developer to use.
To see how it works, let's add a ViroARPlaneSelector into our scene. First, add ViroARPlaneSelector as a new component as shown below:
import { ... ViroARPlaneSelector,} from 'react-viro';
Next add a ViroARPlaneSelector by pasting the following code into your ViroARScene component.
<ViroARPlaneSelector />
Save your file and reload the testbed app. In addition to the previous scene, you should now see planes appear as you move around your room. In our real world, both the table and floor plane were detected as shown below:
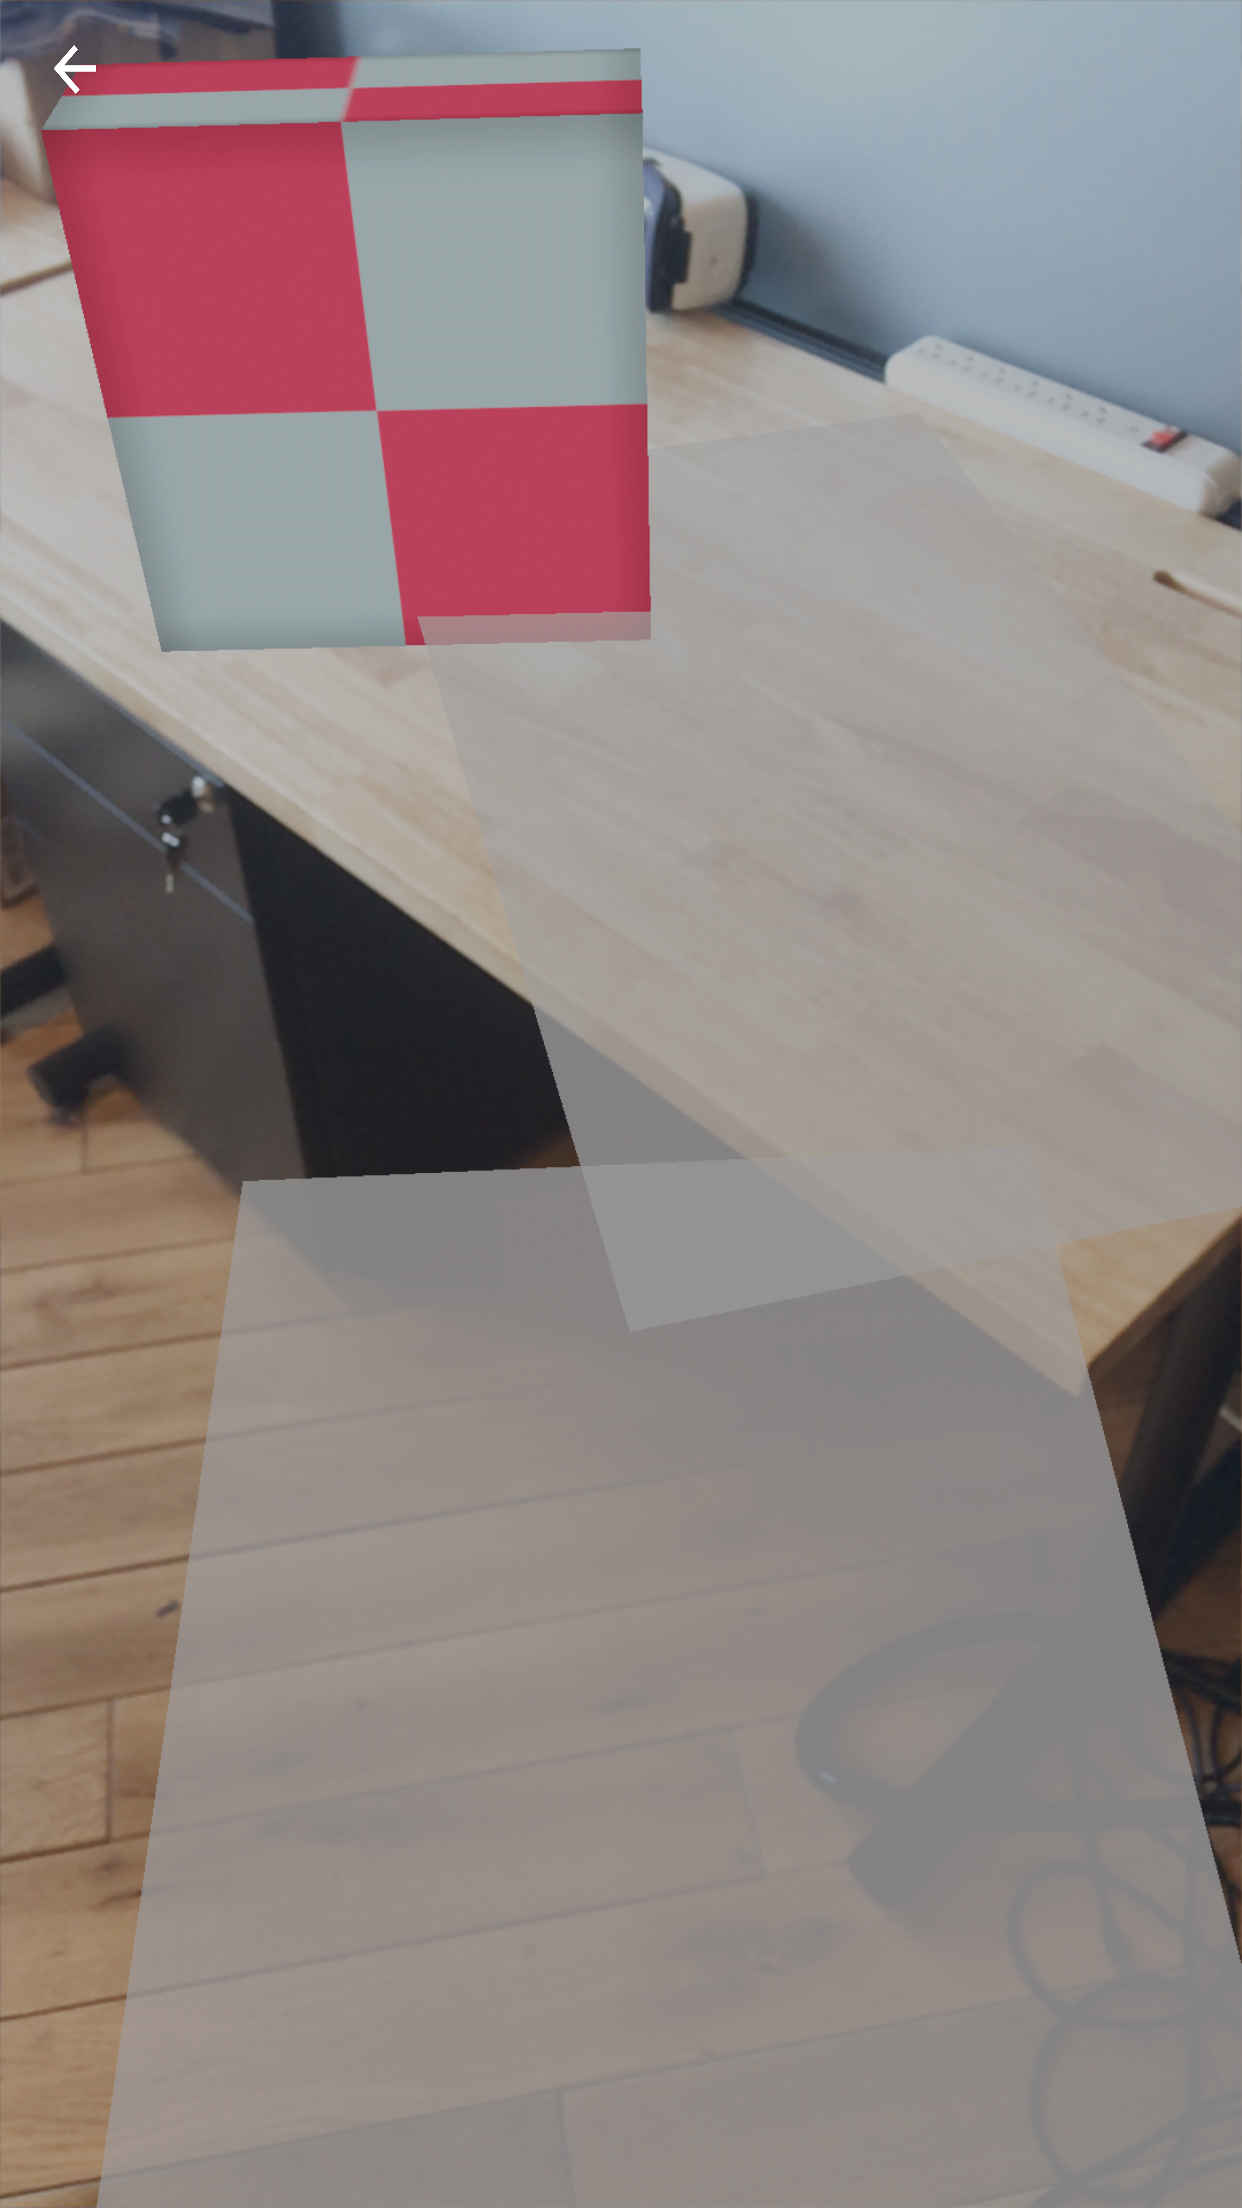
If you try "selecting" a plane by tapping on it, they will simply all disappear as nothing was added within the ViroARPlaneSelector, in the next section, we'll show you how to add a component to it.
Add a 3D Object to the Plane
Previously, when we added our emoji to the scene, it was at a fixed position as shown {[-.5, -.5, -1]} as shown below:
<Viro3DObject source={require('./res/emoji_smile/emoji_smile.vrx')} resources={[require('res/emoji_smile/emoji_smile_diffuse.html'), require('res/emoji_smile/emoji_smile_normal.html'), require('res/emoji_smile/emoji_smile_specular.html')]} position={[-.5, .5, -1]} scale={[.2, .2, .2]} type="VRX" />
With AR, we often times want objects to be placed in relation to the real world. Using the planes we identified earlier, let's place our emoji on a plane. First, delete the you just added from your js file. Then replace the Viro3DObject code above in your HelloWorldSceneAR.js file with the code below:
<ViroARPlaneSelector> <Viro3DObject source={require('./res/emoji_smile/emoji_smile.vrx')} resources={[require('res/emoji_smile/emoji_smile_diffuse.html'), require('res/emoji_smile/emoji_smile_normal.html'), require('res/emoji_smile/emoji_smile_specular.html')]} position={[0, .5, 0]} scale={[.2, .2, .2]} type="VRX" /></ViroARPlaneSelector>
Notice that we also changed the position of the emoji to [0, .5, 0]. This is because the emoji's center is within the emoji itself, so to make it sit "on" the plane, we need to shift it slightly above where the plane is
Save the file and reload the testbed app.
Now that we have placed the 3D Object inside the ViroARPlaneSelector, when a plane is tapped, the emoji will be placed on the selected plane and the other ones will disappear.
Interactions and Animations
One of the great things about AR that users can move about their world to view and interact with objects from different angles. Let's add interaction to the emoji and some movement to the box.
First let's make the emoji draggable so that it can be moved with the drag gesture. First we need to import another component ViroNode:
import { ... ViroNode,} from 'react-viro';
In the previous step, we placed our emoji within a ViroARPlaneSelector component as shown below.
<ViroARPlaneSelector> <Viro3DObject source={require('./res/emoji_smile/emoji_smile.vrx')} resources={[require('res/emoji_smile/emoji_smile_diffuse.html'), require('res/emoji_smile/emoji_smile_normal.html'), require('res/emoji_smile/emoji_smile_specular.html')]} position={[0, .5, 0]} scale={[.2, .2, .2]} type="VRX" /></ViroARPlaneSelector>
To make our emoji drag along real-world surfaces, we need to replace ViroARPlaneSelector with a ViroNode, set the dragType to "FixedToWorld", and add an empty anonymous function to let the platform know that we want this object to drag.
Replace the above code block with the one below:
<ViroNode position={[0,-1,0]} dragType="FixedToWorld" onDrag={()=>{}} > <Viro3DObject source={require('./res/emoji_smile/emoji_smile.vrx')} resources={[require('res/emoji_smile/emoji_smile_diffuse.html'), require('res/emoji_smile/emoji_smile_normal.html'), require('res/emoji_smile/emoji_smile_specular.html')]} position={[0, .5, 0]} scale={[.2, .2, .2]} type="VRX" /></ViroNode>
Save your file and reload the testbed app.
The emoji should now appear in front of you and to the left. You should now be able to touch and drag the emoji around the scene, notice how it moves along real world surfaces.
Animation
Finally, let's add some movement to the box. First, we need to import ViroAnimations
import { ... ViroAnimations,} from 'react-viro'
Next, replace the ViroBox component with the following:
<ViroBox position={[0, -.5, -1]} scale={[.3, .3, .1]} materials={["grid"]} animation={{name: "rotate", run: true, loop: true}}/>
As you can see, we added a new property animation with the value {name: "rotate", run: true, loop: true}. The name refers to an animation we will register in the next step like we did for ViroMaterials above.
Find where we registered ViroMaterials (near the bottom of the file), copy and paste the following code below it:
ViroAnimations.registerAnimations({ rotate: { properties: { rotateY: "+=90" }, duration: 250, //.25 seconds },});
Save your file and reload the testbed app. You should now see "Hello World", a spinning box and be able to drag the emoji. An example of the complete final code is posted at the end of this tutorial.
Next Steps
Continue Modifying the Scene
You should now have a basic overview for how ViroReact works. Check out our Code Samples for other example apps, or continuing adding functionality on your own to the HelloWorldScene. For example:
- Add an animation to other objects in the scene. Look at our Animation Guide for info on how to accomplish this.
- Try adding shadows and illumination to the scene. Check out the Lighting and Materials guide for details.
HelloWorldSceneAR Tutorial - Final Code
'use strict';import React, { Component } from 'react';import {StyleSheet} from 'react-native';import { ViroARScene, ViroText, ViroConstants, ViroBox, ViroMaterials, Viro3DObject, ViroAmbientLight, ViroSpotLight, ViroARPlaneSelector, ViroNode, ViroAnimations,} from 'react-viro';export default class HelloWorldSceneAR extends Component { constructor() { super(); // Set initial state here this.state = { text : "Initializing AR..." }; // bind 'this' to functions this._onInitialized = this._onInitialized.bind(this); } render() { return ( <ViroARScene onTrackingUpdated={this._onInitialized} > <ViroText text={this.state.text} scale={[.5, .5, .5]} position={[0, 0, -1]} style={styles.helloWorldTextStyle} /> <ViroBox position={[0, -.5, -1]} scale={[.3, .3, .1]} materials={["grid"]} animation={{name: "rotate", run: true, loop: true}}/> <ViroAmbientLight color={"#aaaaaa"} /> <ViroSpotLight innerAngle={5} outerAngle={90} direction={[0,-1,-.2]} position={[0, 3, 1]} color="#ffffff" castsShadow={true} /> <ViroNode position={[0,-1,0]} dragType="FixedToWorld" onDrag={()=>{}} > <Viro3DObject source={require('./res/emoji_smile/emoji_smile.vrx')} resources={[require('res/emoji_smile/emoji_smile_diffuse.html'), require('res/emoji_smile/emoji_smile_normal.html'), require('res/emoji_smile/emoji_smile_specular.html')]} position={[0, .5, 0]} scale={[.2, .2, .2]} type="VRX" /> </ViroNode> </ViroARScene> ); } _onInitialized(state, reason) { if (state == ViroConstants.TRACKING_NORMAL) { this.setState({ text : "Hello World!" }); } else if (state == ViroConstants.TRACKING_NONE) { // Handle loss of tracking } }}var styles = StyleSheet.create({ helloWorldTextStyle: { fontFamily: 'Arial', fontSize: 30, color: '#ffffff', textAlignVertical: 'center', textAlign: 'center', },});ViroMaterials.createMaterials({ grid: { diffuseTexture: require('res/grid_bg.html'), },});ViroAnimations.registerAnimations({ rotate: { properties: { rotateY: "+=90" }, duration: 250, //.25 seconds },});module.exports = HelloWorldSceneAR;
Updated about 4 years ago